How to remove hardened exterior caulk? (With Tools & Method)

No matter what kind of construction project you're working with, you're almost guaranteed to find caulk. It's used throughout the construction industry to seal joints, weatherize doors and windows, and keep moisture out of buildings. Unfortunately, exterior caulk may not be replaced as frequently as it should be. In these situations, you'll wind up with hardened exterior caulk.
Hardened exterior caulk is dry, brittle, and doesn't work as it should. Instead of sealing the joint from air and moisture, it has numerous cracks that allow both to leak in. This leads to increased energy bills. It can also allow moisture to seep into the building slowly, creating the perfect area for mold and mildew growth. When this happens, the exterior caulk must be stripped out completely, then the area needs to be cleaned thoroughly so that new caulk can be applied. This provides a clean surface for a new seal.
Removing hardened exterior caulk is not complicated, but it can be tedious. Removing the caulk with power tools creates a powder that is dangerous to inhale. This means that the hardened exterior caulk needs to be removed manually, by hand. You may be able to simply scrape it off, or you may need to soften the caulk before it can be removed.
This article will discuss the tools that you'll need to remove caulk from your surface, how to soften old caulk, and how to remove leftover caulk residue. Let's get started and learn about this process.
Tools to Remove Hardened Exterior Caulk
One important part of removing exterior caulk after it's hardened is having the correct tools in your toolbox. Being well-prepared will help ensure that you can remove old, hardened caulk with ease. You can find most of the tools that you need at your local hardware store or by making a single online order before you get started. Planning ahead will help make sure that you don't have to stop mid-job to make an additional run to the hardware store.
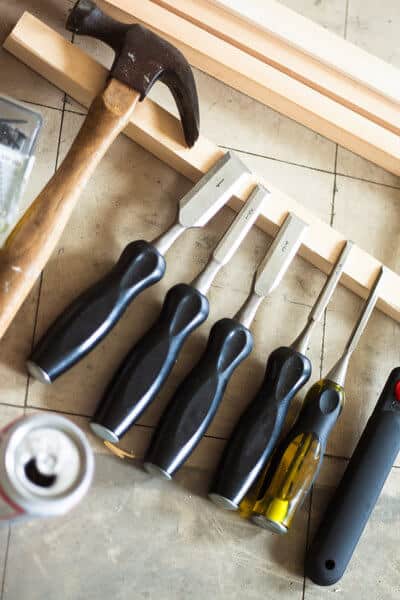
There are a variety of tools you can use for this project, including the following:
Utility Knife
A utility knife is a tool that be purchased at most hardware stores and general stores. It is used for cutting the caulk and removing it from the surfaces that it's sticking to. Utility knives are best suited for small surfaces, short lengths of caulk, and caulk that is very brittle and comes up easily. This knife is recommended if you will be removing caulk from smooth exterior surfaces. A utility knife is not recommended for long lengths of caulk, or if you find that the caulking does not remove easily. If it doesn't remove easily, it's unwise to use the sharp blade of a utility knife to assist you with the process, as you could cut yourself severely.
Ripping Chisel
If you will be removing harder exterior caulk, a ripping chisel is an essential tool to have on hand. This tool is perfect for when caulk is in harder to reach areas. Ripping chisels are not indicated for longer caulk lengths and work best for shorter thicker amounts. Using this tool will let you apply extra pressure as you remove hardened exterior caulk from your construction project. Ripping chisels are great for when the gap that has been filled is larger or wider, as there's more caulk to remove. However, you'll have to use it with care so that you don't accidentally damage the areas around the hardened caulk.
Putty Knife
This is the most popular tool for removing hardened exterior caulk. It is best for when the caulk is loose or crumbling, and when the surface will be entirely redone. It works very well on rougher surfaces, but the area will usually need to be sanded after you're finished.
How to Remove Hardened Exterior Caulk Safely
Removing caulk often releases dust and other contaminants into the air. This exposes you to these contaminants and you may inhale them throughout the process. Your goal is to limit this as much as possible, so that you can stay healthy.
- Consider wearing a dust mask to limit the amount of dust, debris, and contamination that you inhale throughout the process.
- Opt for coveralls and gloves that will resist chemicals and protect your hands. You will need solvents to remove hardened exterior caulk, so it's important to wear gloves to protect your skin.
- Opt for protective safety glasses, as well, to keep fragments of caulk from injuring your eyes.
Wearing protective gear may seem unwieldy, but it's a vitally important part of the process. Personal Protective Equipment (PPE) helps keep you safe from breathing in contaminants, exposing your skin, eyes, or airways to harsh chemicals, or accidentally injuring yourself.
How to Remove Hardened Exterior Caulk: Softening Caulk for Removal
As you begin to remove hardened exterior caulk, you'll quickly notice that it's not an easy process. Softening the old caulk can help make it easier to remove from exterior surfaces. You may be able to gradually soften extremely hard caulk so that it's easier to remove, using either commercially available products or solutions that you make at home. You'll need to be prepared for this project to take a few hours.
Commercial Caulk Remover
One way to soften older caulk is by using products that you've purchased specifically for the task. These products are designed to soften old caulk so that it can be removed without damaging your exterior surfaces, but they'll take a bit of time to work.
Before you get started, read the instructions completely. Then apply a thick line of caulk remover completely covering the existing line of caulk. Allow the commercial solution to sit on the caulk for the recommended amount of time, then begin scraping caulk (while wearing gloves). If you wait for a longer period of time, you may find that the caulk gets even softer, which will make removing it an even easier task.
Creating Caulk Removal Solutions at Home
If you don't have any commercial remover on hand, you may have options available at home that will help you soften caulk that has hardened and dried. Caulk that is either water-based, acrylic, or contains polyvinyl acetate can be removed using rags soaked in rubbing alcohol.
Silicone caulk is significantly harder to remove, but you may be able to use a strong powdered cleanser mixed into a paste. Apply this to the caulk to see if it softens it. If not, you may need to move to a commercial solution.
Heat is also useful as you work to remove hardened exterior caulk. Your hair dryer is probably hot enough to help soften old caulk around your house, just be careful not to damage any plastic construction materials. The heat from the hair dryer will warm the caulk enough that it can be scraped away more easily. Stay patient and work through the process a little at a time, applying heat to a small area, scraping the caulk loose, and then moving on to the next area. You may find that softer areas of caulk require a bit less heat than older, harder areas. Either way, the heat from the hairdryer can make a dramatic difference as you work to remove old, brittle, exterior caulk.
Removing the Caulk
After you've softened all of the caulk, it should be easier to remove it from the exterior surface of the building. Remove it using the appropriate tool, such as a putty knife or ripping chisel. These tools are useful for pulling caulk out of the spaces that it's been squeezed into. Be careful not to scrape the wood or fixtures of the building with your tools as you carefully work to remove the hardened caulk.
You may want to be prepared with a drop cloth and several contractor bags, as well, so that you have a well defined place to put the old damaged caulk. Otherwise, you'll end up with brittle, broken caulk pieces all over the ground that you'll have to go back and clean up later. If you're working on a ladder, attach the trash bag securely to the ladder so that you don't have to climb up and down the ladder each time you have a strip of caulk to dispose of.
Removing Caulk Residue
Rinse away leftover residue with warm water and then allow the area to dry before you begin the process of adding fresh caulk. If the area has dirt or mildew, you may want to use a bleach solution to clean it thoroughly.